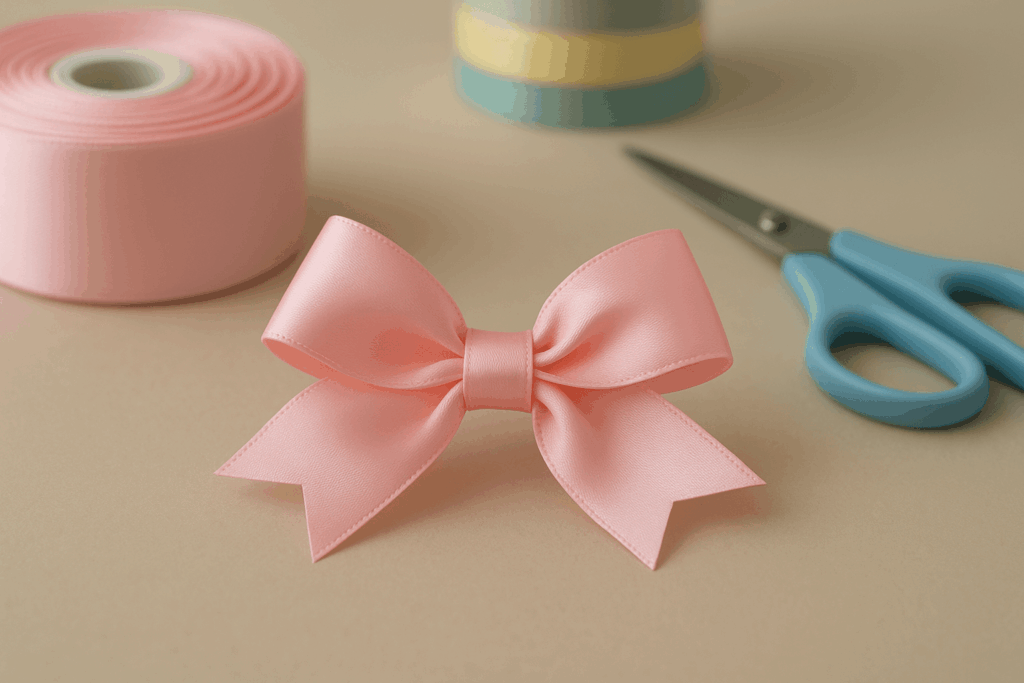
If you’ve ever tried finding the perfect bow in a store, you already know the struggle. The color’s a shade off, the size looks wrong, or it’s just too expensive for something that tiny. That’s usually when most people think, “Maybe I should just learn how to make ribbon bows myself.”
And honestly? You can. It’s simpler than it looks. Once you understand how the ribbon behaves, you can make your own DIY hair bows for gifts, birthdays, school days – or even for a small shop if that’s in the cards. You don’t need fancy tools or craft experience, just a bit of patience and the right ribbon.
We’ll go step-by-step, from picking your first spool to tying it right and fixing the little mistakes everyone makes at the start. By the time you reach the end, you’ll have at least one finished bow you’ll want to show off.
Why Ribbon Choice Matters
The ribbon you pick decides how easy (or painful) this process will be. Some ribbons are made to hold shape; others just aren’t.
You’re new, start with grosgrain ribbon. It has that ribbed texture that grips well and doesn’t slide around. It’s the type most professionals use, and it’s forgiving. You can untie and retie it a few times without ruining the fabric.
Satin bows is gorgeous, no doubt, but it’s slippery. It’ll test your patience if you’re still learning. Organza is delicate and sheer, perfect for layering but not strong on its own. And if you ever want big, puffy bows that hold up beautifully, try wired ribbon. Those thin wires running along the edges are lifesavers.
The width matters too. A one-inch ribbon makes a simple, everyday bow. Two and a half inches? That’s your big statement bow for parties or photos.
Still unsure where to start, Beyond Creations’ Signature Grosgrain Collection has all the beginner-friendly types. They’re structured, soft, and reliable. It might be exactly what you want when learning.
What You’ll Need to Make Your First Ribbon Bow
Before you dive in, grab these basics. You’ll find most of them around the house.
What you’ll need:
- Grosgrain ribbon (1-2 inches wide)
- Scissors (fabric ones are best)
- Alligator clips or hair ties
- Hot glue gun or thread and needle
- Lighter (to seal ribbon edges)
Optional, but helpful:
- A fork (yes, a regular dinner fork works)
- Measuring tape
- Dress pins to keep things steady
Set everything out on a clean surface. Trust me, ribbon collects lint like a magnet, and glue finds its way everywhere. Once your workspace looks good, you’re ready.
The Classic Way: Tying by Hand
Let’s start with the simple method. No tools, just your hands. Think of it like tying a shoelace, but only prettier.
Step 1: Cut around 20 inches of ribbon. You can always trim the extra later.
Step 2: Hold the ribbon behind where you want the bow to sit. Keep both ends even.
Step 3: Make your first loop with the right end, then another with the left.
Step 4: Cross the right loop over the left, bring it under, and pull it through.
Step 5: Adjust gently until both loops look even. Trim the ends diagonally, then lightly run a lighter along them to stop fraying.
That’s it. Your first ribbon hair bow. It might not look perfect yet, but that’s how everyone starts. With a little practice, your fingers will start remembering the motion on their own.
The Fork Method (for Perfect Tiny Bows)
When you want smaller bows like the ones you see on baby headbands or school clips try the fork method. It’s neat, fast, and produces uniform results.
Stage 1: Take a fork (a four-pronged one works best).
Stage 2: Slide one end of your ribbon under the middle two tines, leaving a small tail behind.
Stage 3: Wrap the other end of the ribbon over the front, around the back, and back over again, forming a figure-eight.
Stage 4: Now take the short end, thread it through the center space between the tines, pull it up, and tie a small knot.
Stage 5: Gently slide the bow off, and there it is, perfect symmetry!
Seal the edges, fluff the loops, and you’ve got yourself a clean, uniform DIY hair bow. Once you master this, you can make dozens in one sitting without much thought.
Fun Ribbon Bow Variations to Try
There’s no single kind of bow. You can go simple or dramatic depending on where you’ll use it.
- Classic Bow: Two loops and two tails. Always works. Always looks right.
- Double Bow: Layer two bows together for more volume. Use medium-width ribbon for balance.
- Spiker Bow: Cut your ends into “V” shapes and layer them. It gives a trendy, playful look.
- Mini Bow: Around two inches wide, perfect for newborns or small clips.
- Boutique Bow: The big, layered one you see in photos. It’s bold and takes practice, but it’s worth learning later.
Once you’ve got the hang of one, try mixing materials like grosgrain with satin or sheer ribbon layered on top for a soft shimmer.
How to Attach Bows to Hair Accessories
Now comes the fun part: turning your ribbon into something wearable.
- Using Alligator Clips (Hot Glue): Add a dab of glue to the clip, press your bow on, and hold for ten seconds. Done.
- Using Thread: If you prefer sewing, stitch the bow’s center onto the clip. It lasts longer and looks tidier.
- For Hair Ties: Loop a ponytail holder through the bow’s center before tightening.
- Headbands: Attach your bow in the middle of a soft elastic band and secure with a few stitches.
Making bows for kids who move around a lot, use both glue and thread together for extra strength.
Common Mistakes Beginners Make
No one gets it perfect on day one. Here’s what usually goes wrong, and how to fix it.
- Frayed Ends: Seal edges with a lighter or a bit of clear nail polish.
- Uneven Loops: Measure your ribbon evenly before tying. Then adjust slowly until both sides match.
- Floppy Shape: Use wired or grosgrain ribbon. Avoid soft satins until you’re more confident.
- Glue Bleeds Through: A little glue goes a long way. If it’s soaking through, try stitching instead.
- Ribbon Slips While Tying: That’s satin being satin. Keep your fingers dry and use firm tension.
Once you’ve fixed a few, you’ll start spotting these before they happen.
Choosing Ribbon Colors That Work
Color is what makes your bow yours. Here’s a simple way to pick shades that always look good.
- Neutrals: White, cream, and gray never clash.
- Gold: A golden hair ribbon looks rich and festive, especially layered over navy or deep red.
- Pink: You can’t go wrong with a pink ribbon hair bow. Baby pink for soft looks, fuchsia for fun, and rose for something elegant.
- Red: A red ribbon bow for hair always stands out. It’s perfect for Christmas or birthdays.
- White: White ribbon hair bows look crisp and clean, especially on darker hair.
Think about where the bow will be worn. Bright shades pop on photos, while muted tones look classy for everyday wear.
Ideas to Style and Use Your Handmade Ribbon Bows
If you want to understand the detailing and patterns, you can study pre-made ones from Beyond Creations. You’ll see tiny details like edges sealed cleanly, loops balanced, and knots centered.
Check the Signature Grosgrain Double Knot Bow. It’s a great model to learn from. The loops stay even, and the finish looks polished.
The glam ribbon bow collection shows how metallics can make a simple bow look rich without being flashy. And if you love dainty designs, the Crochet Edge Bow is worth studying for texture ideas.
Don’t just buy them, observe them. You’ll start picking up little tricks that’ll quietly improve your own work.
Your First Three Projects
When you’re ready to make your first few bows, start simple. Here’s something fun to try if you’d like:
Project 1: Practice Bow
Cut a strip of grosgrain ribbon about 18 inches long. Tie it the classic way. Adjust until the loops match.
Project 2: Fork Bow
Use the fork method. Make a few identical bows and line them up. You’ll instantly see how consistent they look.
Project 3: Clip Attachment
Glue one of your bows to an alligator clip. Congratulations! It’s wearable now.
These first few pieces might feel imperfect, but they’ll be your best teachers. Keep them. You’ll look back later and realize how much cleaner your work has become.
Wrapping Up
Making hair bows isn’t about getting it perfect on day one. It’s about finding your own rhythm, the way the ribbon feels between your fingers, and the moment the loops fall into place.
Every crafter has that first wobbly bow that started it all. You’ll have yours too. With a few tries, the process becomes second nature, and you’ll start creating bows that look like the ones you wanted to buy.
When you’re ready to take it further, explore Beyond Creations’ collections. Look at how they combine texture, color, and balance. You’ll start noticing what makes one bow feel “finished” while another just doesn’t click.
So, grab that ribbon roll, make your first three bows, and keep going. By the end of the week, you’ll have a small collection (and maybe a new favorite hobby!)