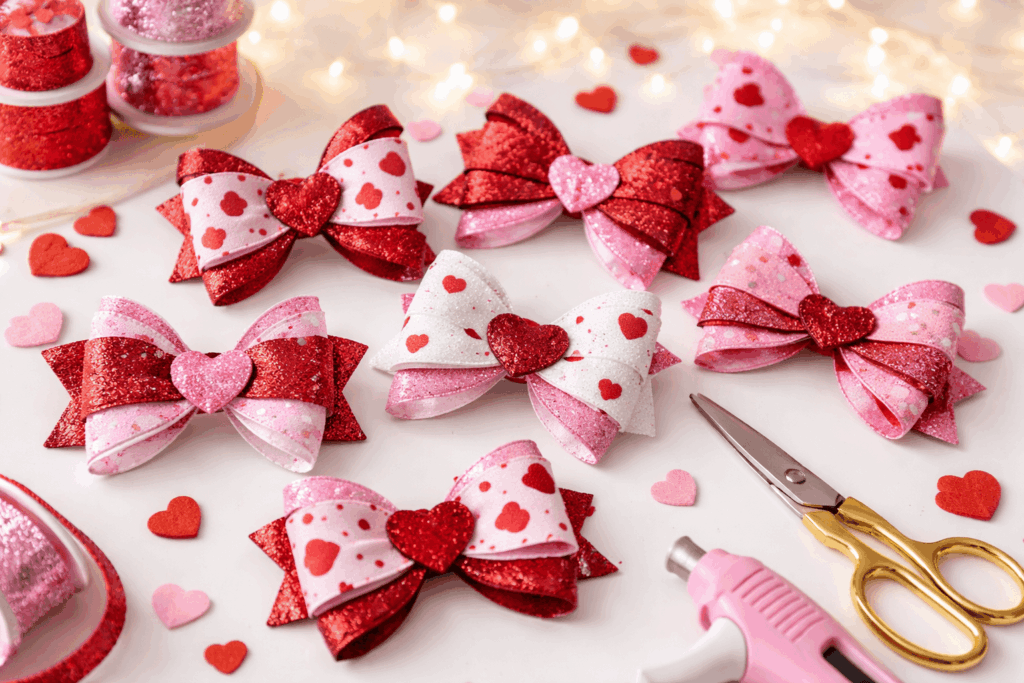
Valentine hair bows with glitter ribbon have exploded as a DIY trend recently. Whether you’re crafting beautiful bows for your kid or testing the waters with a small business, this guide covers everything from materials to selling strategies.
The good news: anyone can master the techniques needed to create stunning glitter hair bows that stay put and look polished.
Understanding Glitter Ribbon Types for Hair Bows
Picking the right ribbon for Valentine projects starts with knowing what materials exist.
1. Grosgrain Glitter Ribbon
Is a polyester or polyester-cotton blend with a recognizable ribbed texture that keeps its shape without constant fussing. Unlike flimsy alternatives, grosgrain resists fraying and delivers that crisp finish that separates professional DIY Valentine hair bows from homemade-looking ones.
2. Pink Glitter Ribbon
The obvious choice for Valentine hair bows. The appeal is straightforward: polyester base with metallic threads running through. It gives you that sparkle without being over the top. For most people, 2-inch width hits the sweet spot when making ribbon hair bows, wide enough to look full and intentional.
3. Metallic Sheer Glitter Ribbons
This work is different. They catch light in interesting ways thanks to holographic finishes, making them solid picks if you’re layering bows. Plain satin ribbons nicely with glitter varieties if you want two-tone designs. For maximum sparkle, mix pink glitter ribbon with gold or silver metallic accents.
Materials and Tools for Making Glitter Ribbon Hair Bows
Here’s what you need before starting:
1. Materials
- 30-45 inches of pink glitter ribbon or glitter ribbon for cheer bows (1.5-to-2.5-inch width work best)
- 3/8-inch grosgrain ribbon for wrapping the center
- Double-pronged hair clips (45mm size) or alligator clips
- Hair elastics (optional, but useful)
- Craft wire or heavy-duty thread for binding
2. Glues and Heat Equipment
- Hot glue gun with standard clear sticks
- Lighter or long-neck BBQ lighter for sealing ribbon edges
- Optional: E6000 adhesive or flexible heat glue if you want extra staying power
3. Everything Else
- Good fabric scissors
- Measuring tape
- Hairspray for setting the shape
- Paper template or cardboard (helpful, not essential)
- Craft wire needle if you’re hand-stitching
Sharp scissors matter more than you’d think. Dull blades leave jagged edges that fry worse than a clean cut, meaning more heat-sealing work later.
Step-by-Step Tutorial: How to Make Valentine Hair Bows with Glitter Ribbon
1. Preparing Your Glitter Ribbon
Start by cutting your pink glitter ribbon to length. Standard hair bows for valentines use 30 inches; if you’re going for big valentine hair bows, add 45 inches instead. Cut slightly longer than you think you need so you can test your heat seal technique on scraps first.
Cut a small piece of your glitter ribbon and try the heat seal on it. Hold the cut edge close to a lighter flame for about 1-2 seconds. You’ll see the fibers melt slightly, creating that sealed edge. This is what stops glitter ribbon from coming apart at the seams.
Metallic ribbons can spark and catch fire. Skip the heat seal on those and stick with polyester-glitter varieties.
2. Creating the Bow Loops Without a Bow Maker
Professional bow makers cost real money. You don’t need one. Your hands work just fine for making beautiful glitter ribbon hair bows.
1. The Two-Finger Method
- Hold your glitter ribbon loose between thumb and forefinger
- Fold it back toward yourself to create the first loop
- Pinch that fold point
- Wrap the ribbon around your fingers to make a second loop on the other side
- Keep going until you’ve got 4-6 loops depending on how full you want it
- Hold everything together or secure it with a craft wire.
2. The Template Method
- Take a 3-4-inch circle on cardboard
- Wrap your pink glitter ribbon around it multiple times
- Clamp the center tight and wrap with wire
- Carefully slide off the template
- Fluff those loops outward to shape your bow
3. Securing the Bow Center
Now you’ve got loose loops that need binding. Try any of these three approaches here:
1. Wire Method
Thread craft wire through the center and twist it tight on the back. It distributes pressure evenly and stays put. Cut off excess wire and tuck the ends safely.
2. Thread Method
Hand-stitch through the bow center 6-8 times with heavy embroidery thread, pulling tight with each pass. This is solid for ribbon hair bows that’ll get regular handling. It takes longer but gives you control.
3. Hot Glue Method
Run hot glue around the center, then wrap with your 3/8-inch center ribbon. Hold for 30 seconds. It looks clean and finished.
4. Attaching Hair Clip Hardware
Getting the bow to the clip properly determines whether it lasts or ends up in the trash.
- Cut 1.5 inches of your center ribbon (3/8-inch width)
- Heat seals both end with the lighter
- Apply hot glue along one side of the ribbon
- Wrap it around the clip’s center pinch point, starting underneath
- Press the ribbon into the clip’s grip area firmly
- Add more hot glue underneath for extra hold
- Wait 2-3 minutes for it to set
For bows you’re selling or that’ll see heavy use, use flexible-grade hot glue that bends with the clip or combine hot glue with E6000 that cures over 24 hours. This combo creates a bond that lasts.
5. Adding Final Details and Embellishments
Transform your basic bows into actual valentine hair bows people get excited about:
Center Decoration Options:
- Sparkly button or pearl
- Heart-shaped rhinestone
- Silk flower or ribbon rose
- Sequin detail
- Metallic cord or braid
Hot glue these in place and let them cure for 1-2 hours before wearing or packaging.
Final step: Light hairspray around the whole bow to lock the shape in place.
Bonus Tips for Professional-Looking Results
1. Layering Strategy
Build volume with two ribbon hair bows of different sizes stacked together. Glue a smaller glitter hair bow on top of a larger one in contrasting colors for dimension.
2. Hairspray Shaping
Mist your finished diy valentine hair bows with hairspray and guide the loops into shape. Place them on paper with a template cutout while the spray dries to hold the form.
3. Wire Structure
For bows that stay shaped during wear, wrap small floral wire around your loops during construction. This matters for big Valentine’s hair bows that would otherwise sag from weight.
4. Color Blocking
Mix pink glitter ribbon with solid colors like deep red, white, or rose gold for a color-blocked look that stands out.